Make Visual Novels Romance Shader Pack
A downloadable asset pack
Make Visual Novels Romance Shader Pack for Ren’Py
A message from Stella, that person behind this pack:
“Make Visual Novels exists to help devs make cooler, weirder, awesomer visual novels. We do that by running events, making packs, and managing stuff like the VNDev.Wiki! But running events, competitions, and resources costs money. Buying this pack helps me fund new shader packs, DevTalks, and keep our community thriving.”
What is this?
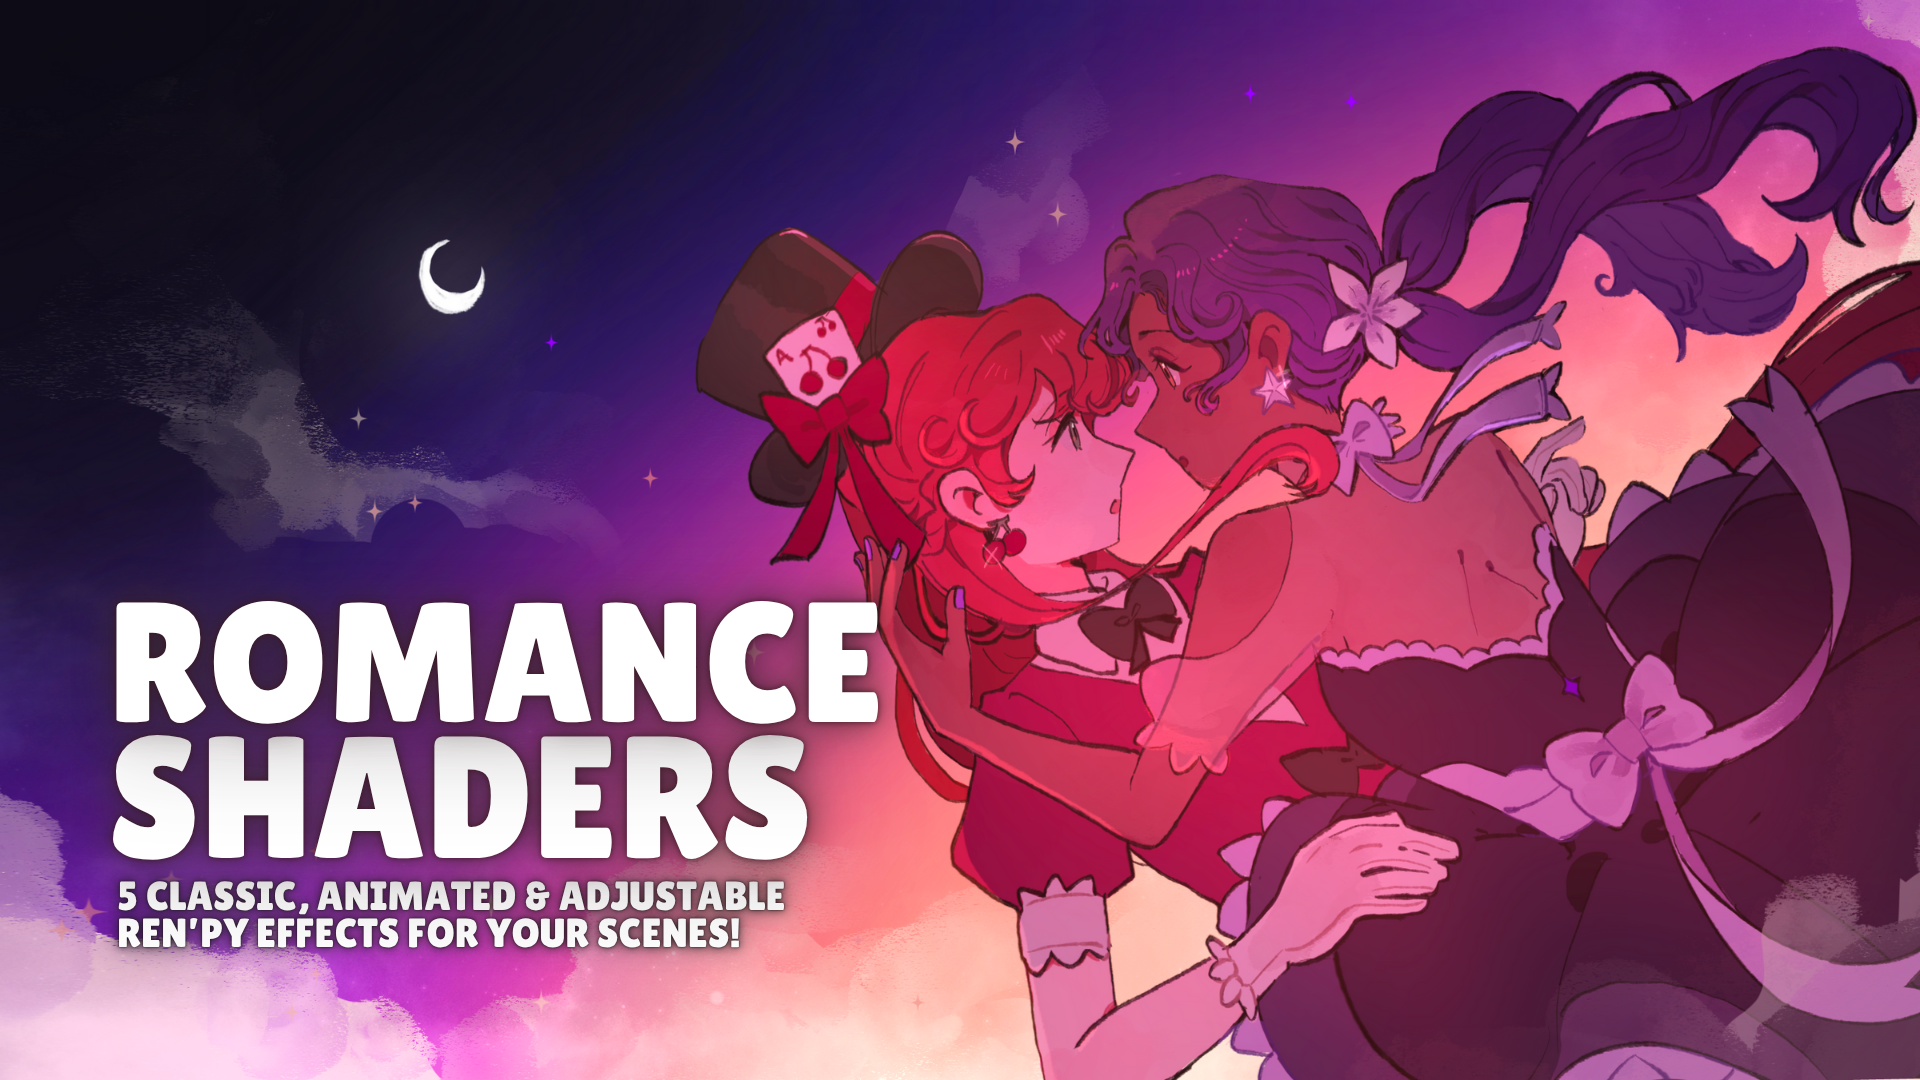
This is a lovely pack of effects for Ren’Py that make your romantic scenes pop with just the right amount of sparkle, glow, and flair.
This pack has 5 types of animated, customizable effects designed to be layered with your scene to match your characters' vibes and moments of emotional impact.
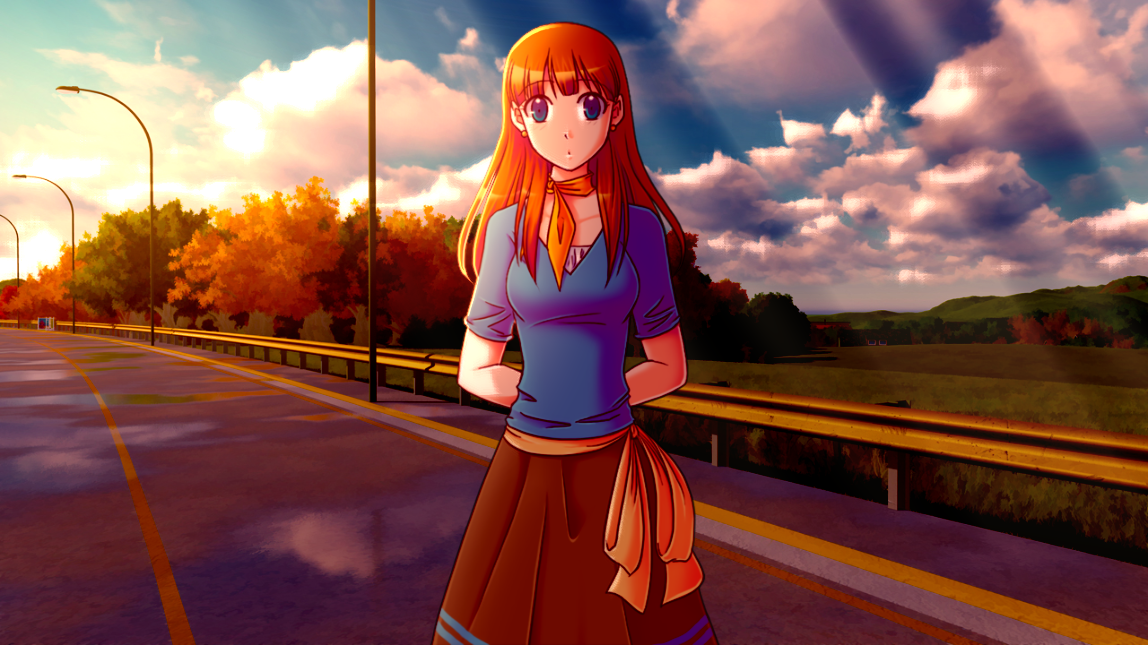
- Bloom gives everything a gentle, glowy haze. Great for adding detail to lighting in a scene and enhance visuals.
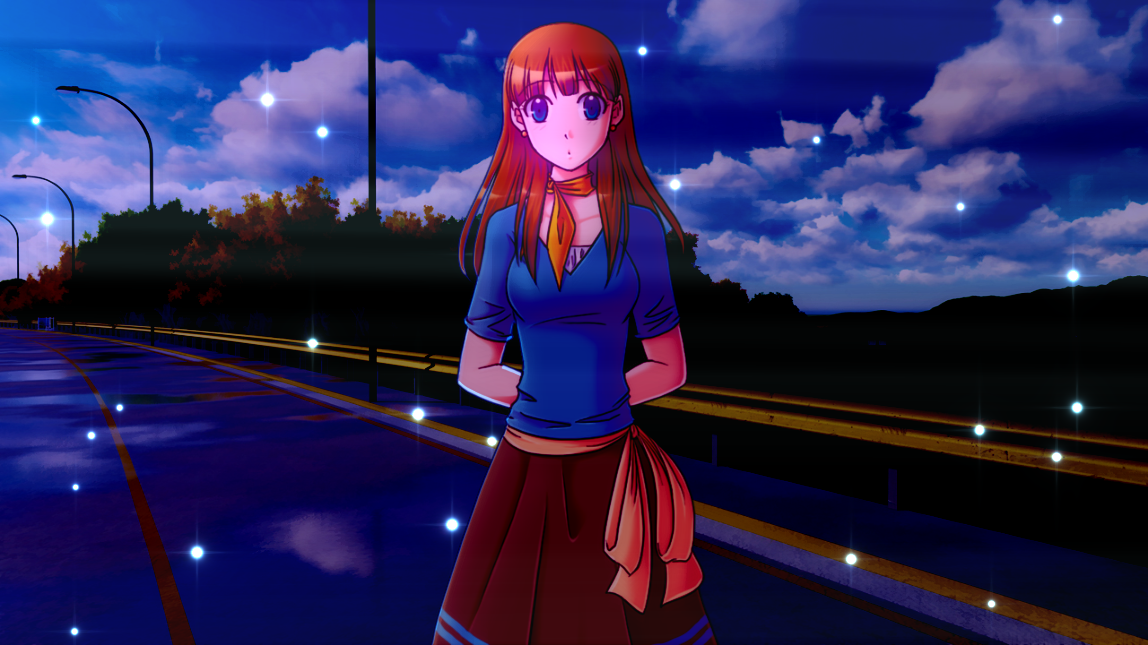
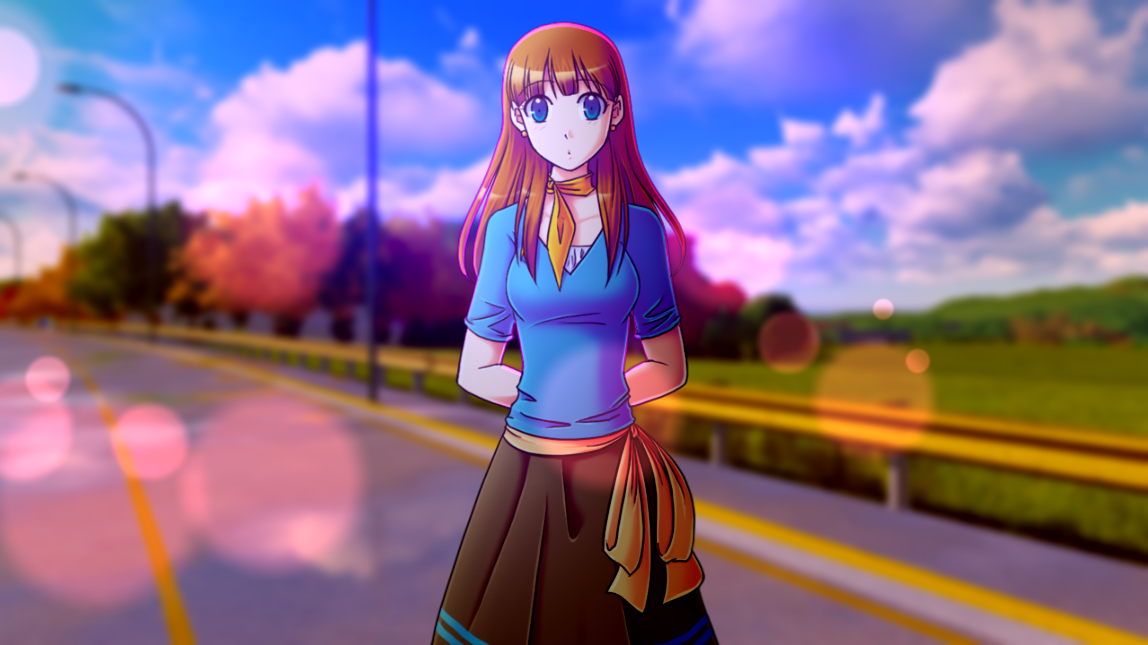
- Bokeh adds the classic floating lights to your scene.
- Glints/Sparkles adds sparkles or stars to the scene.
- Vignette creates a soft pink-tinted edge fade, perfect for quiet gazes and slow-burn moments.
- God Rays answer your prayers of true love, or at least dramatic lighting.
What’s it for?
Blushing declarations? Dramatic tension? Bittersweet goodbye? Apply one shader. Or three. Layer effects to taste.
Works great for:
- Romance routes
- Soft flashbacks
- Love triangle stare-offs
- That one time your MC literally sparkled from secondhand embarrassment
Included Transforms:
- AddBokeh – Gentle additive pink bokeh for soft love scenes and aesthetic sparkle overlays.
- BlissEffect – A timed dreamy fade-to-white effect. Perfect for swoons, kisses, or vision loss due to love.
- Bokeh – Default bokeh shader with soft yellow and pink tones. Good all-around mood enhancer.
- Bloom – Balanced bloom effect for everyday glow-ups and soft glam looks.
- ColorBokeh(amount, density, mode, speed, color1, color2) – A customizable bokeh shader. Choose your density, color, speed, and colors. Be careful about setting amount and density too high, as it could have significant performance impact on lower end machines.
- CreateBokeh(amount, density, mode, speed) – Another customizable bokeh effect, but without the color portions. Be careful about setting amount and density too high, as it could have significant performance impact on lower end machines.
- FuzzyBloom – More intense bloom, fuzzier edges. Great for daydreams, kisses, and blush attacks.
- Glint – Classic animated sparkle generation.
- Godrays – Basic Godray template, copy and customize to tailor it for your scenes..
- MaskedRays(mask, child) – Godrays masked to specific shapes. Great for dramatic lighting through windows.
- MoonBloom – Very soft, low-intensity bloom.
- MoonMotes – Calm, slow-floating blue motes.
- Moonrays – Cool-toned godrays that drift slowly. Ideal for moonlit drama and divine sparkle entrances.
- MVNBubbleBlast – A burst of upward-moving bokeh. Confessions, spells, or emotional explosions.
- MVNBubbles – Soft, floaty bokeh bubbles. Think magical transformations or underwater cuddles.
- MVNVignette – Black soft-edge vignette for drama, dread, or just classy visual framing.
- NegaGlint – Tiny negative-space sparkles for an edgy shimmer. Good for cursed jewelry or darkly dazzling vibes.
- NyoomMotes – Fast-moving blue motes that zip across the screen. Hyperactive fairy dust energy. Mostly for memes.
- OtomeBrains – A soft pink vignette.
Bonus Preset for the SimulatedLighting Shader (Requires the Make Visual Novels! Shader Pack):
- NightLighting – Stylized tri-light pass with rim and fill lighting. Make nighttime scenes feel lit and cinematic. Uncomment it in MVNRomFXTemplates.rpy to use it!
What are these files?
- MVNRomFX.rpy, which contains the code for all included effects.
- MVNRomFXTemplates.rpy is where you'll mostly want to be. Use the prebuilt transforms like any other, and copy/paste them in your own RPY file to customize them more.
Install Instructions:
Unzip the files into your Ren’Py project’s /game/ folder.
How to Use These Effects
- Bloom and Bliss are best when applied to all objects of the scene. Using camera transforms can make it easy for simple scenes. Eg:
camera at Bloom
- Bokeh, God Rays, Glints and Sparkles and Vingette all work best when applied to full screen or on objects that span the entire screen, ideally as named instances of objects. Duplicating your background image as an named instance is perfect for full screen effects:
show (Background Image) at MoonMotes as (Name Of This Instance)
And using the behind keyword can help you layer it properly amongst your other effects, characters and elements.
show (Background Image) at MoonMotes as (Name Of This Instance) behind (NameOfCharacter/Element in the Scene)
The parameterized Bokeh effects (CreateBokeh and ColorBokeh) have specific requirements for their parameters.
- Amount and density need to be floats(numbers with decimals, eg. 1.0, 10.0, 100.0)
- Speed is expressed as (x,y). (1.0,0.0) moves to the right. (0.0,-1.0) moves up. Use different combinations of values to adjust how fast and which direction it moves.
- The "Mode" refers to the blending mode. See this bit in the documentation on available blending modes.
- The colors in ColorBokeh need to be expressed as a collection of 4 floats:, eg: (0.3,0.6,2.0,0.5). This represents the RGBA value it will blend between.
I also recommend also grabbing my original Make Visual Novels! Shader Pack, as it includes many lighting and shading effects that combine very well with these effects, especially the SimulatedLighting shader.
Download
Click download now to get access to the following files:
Development log

Comments
Log in with itch.io to leave a comment.
tysm for this, its great!! youre really talented :)
Good morning at the time i'm writing this. I've been doing test runs on your shader and it came to my attention that bokeh line of transforms aren't playing well with my version of renpy. I've tried several debugging methods like isolation, using different structures, and looking into the code itself. None of them seem to address the two main errors (tuple out of range and faulty operand). I surely hope this isn't a me thing and just the shaders being strange but from the two machines I tested it on, both yielded the same results.
Here's the error (which is new? said something different before):
Here's the code I used:
You're free to take your time as this might be the last I'll make mention of it. Have a great day and keep chuggin along.
Thanks for the error report, I'll dig into it and figure out what's going on. Someone in the Discord was also talking about it and I think something goofy might be happening with it. I might have used an older version of my test code for it instead of the tested one I had ready. I gotta look at it to be sure.
Do you happen to know which version of RenPy this was in? I doubt it's an issue with RenPy, but it helps me reproduce it.
I tested it both on 8.3.7 and 8.4.0. Ty!
Perfect. I'll get to work on it and have it sorted soon.
Sorry for the wait, I figured out what was going on.
Early on when I started working on this pack, Bokeh originally was only going to move in one dimension, so speed was expressed as a float originally. Before I released, I made speed an expression of vec2 so that it could have two dimensional speed. I completely forgot that I did that, so I even included in the instructions to make it a float.
I've updated the templates to use the correct ones. You can replace your MVNRomFXTemplates.rpy and it should straighten it out.
Thanks
Hey, and thank you so much for this amazing plugin! I finally got around to testing the Bloom effect, and I'm running into the same issue (KeyError: 'a_tex_coord') there as well. It only happens when I try showing a displayable that makes use of "Solid("#000")" - regular image files work perfectly!
Is there a way to add the shaders to UI elements like adding it to text to make it glow?
For displayables in the UI, you can apply these to them. For text itself, no, but I have another pack that works with text.
https://makevisualnovels.itch.io/text-pack
Thank you!
question for the vignette, can that change color?
transform MVNVignetteGreen
or whatever.
u_vint_tint (0.1, 0.8, 0.1)
for a green.
camera at MVNVignetteGreen
You can change all the other parameters too. Everything is commented nicely so you can figure out stuff.
If you check transform OtomeBrains that is a vignette with a different colour so you can see what is changed.
You can do this for any of the other effects too to make custom ones.
The transforms in MVNRomFXTemplates are intended to be copied and changed to customize the effects without having to dive into the shader code itself.
Here's a few quick ones I did, but you can tool with the numbers yourself and produce whatever variations you'd like:
YOOOOO!!!!